|
DIY 2A3 Amplifier
Let’s DIY 2A3 amplifier! It is really hard to go wrong with 2A3 tube unless one really messed up the design. The tube I used here for my project are the double plate NOS 6B4G but it has the same electrical characteristics except for the filament that uses 6.3V instead of 2.5V. There is another 6B4G equivalent tube, the 6A3 that is identical to 6B4G except the base / socket (4-pin). Why did I use 6B4G? Price. Yes, I like NOS tubes yet I do not want to pay a premium for the NOS single plate 2A3. The double plate NOS 6B4G is slightly inferior to the NOS 2A3 but is not far away. For 2A3, one can use AC heating with very minimal hum, but for 6B4G, DC heating is required especially if matched with high efficiency speakers. For consistency wise, I’ll just mention 2A3 here since more people are interested in 2A3 instead of the 6B4G.
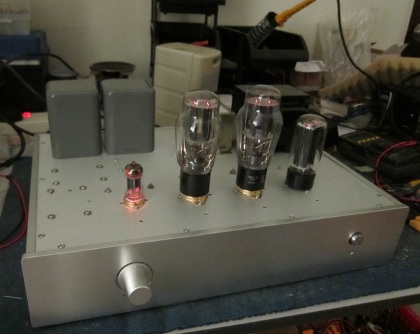
Before we go further, let’s look at the finished amplifier! This is the 1st revision that uses the Tamura F-475 output transformer. It was later changed to Sowter 8995 output transformer with Magnequest plate choke in parafeed configuration. The MOST significant change to the sound is the bass response! Some transparency and immediacy were lesser or veiled due to the addition of parafeed capacitor but it is worth the change if you like solid bass! The bass change is substantial!

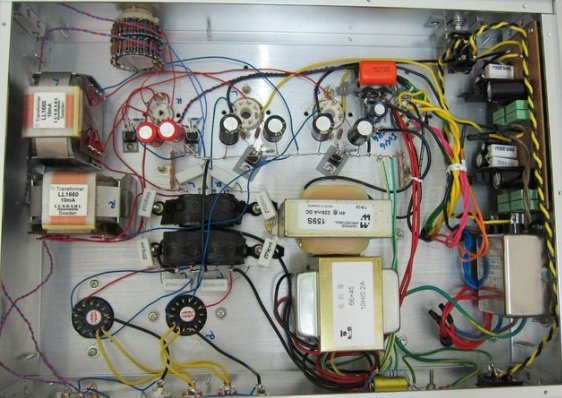
This is the DIY 2A3 amplifier internal picture. Let’s look at the components usage. They’re not exotic but aren’t cheap either. PSU – EMI/RFI filter before the power transformer, 5U4G choke input tube rectification, Black Gate B+ filter capacitors, Orange Drop on 1st stage as high frequency filter, Hammond + PRC made chokes. Driver stage – stepped attenuator with Dale resistors, 5687 (GE 5-star, Tung-Sol) single ended with LL1660 as interstage transformer, cathode bypass caps uses Blackgate NX series with constant current cathode bias using LM317. The operating points I like with the 5687 are either 150V 20mA or 200V 15mA. Power stage – 6B4G / 2A3 with DC or AC heating (DC employed with LM317 regulator using Panasonic FC caps and snubbered bridge rectification), cathode bypass caps uses Blackgate Standard series with constant current cathode bias using LM317, previous output transformer uses Tamura F-475 and later Sowter 8995 and Magnequest BCP-15 plate choke. I’m running the B+ 2A3 at lower voltage / plate dissipation than standard since I do not need it. This could prolong the tube life as well. One can try to bump it up further to get more power out of it. <<<=== * * * * * * * * Check out Amplified Parts with the banner on the left. It is one of our favorite parts source! <<<=== * * * * * * * *
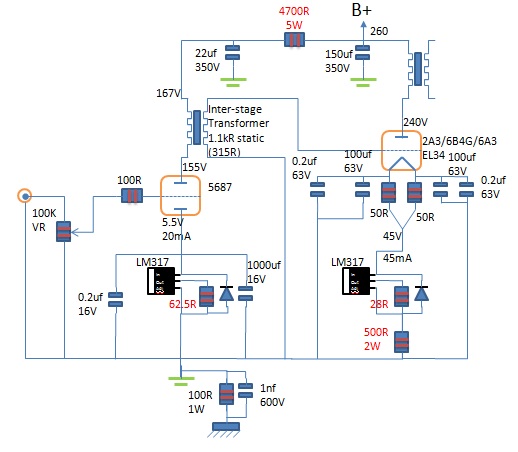
The 2A3 amplifier schematic above uses the standard single ended topology with air-gapped output transformer.
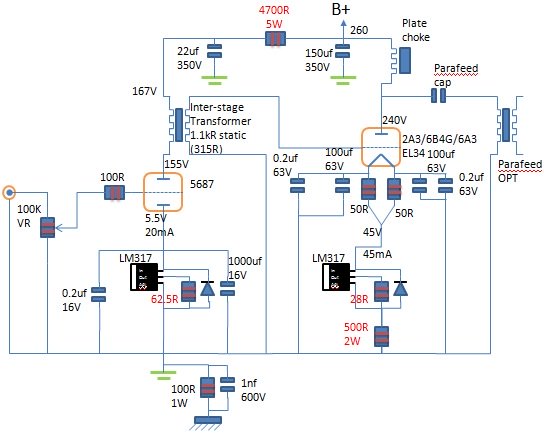
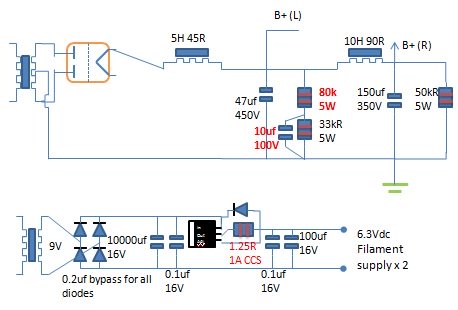
The 2A3 amplifier schematic above uses the parafeed topology with plate choke, parafeed capacitor and parafeed output transformer. Take note that slight adjustments need to be done to the B+ voltage due to different DCR between the parafeed choke versus the air-gapped output transformer. This is a very simple, direct, short signal path DIY 2A3 amplifier with only 2 stages – driver and power. The LL1660 is configured as step-up of 2:4.5 (Alt T in Lundahl datasheet). With 95dB/w/m and above sensitivity speakers, the gain should be sufficient to fill a medium size room. If not, go for the 5842, 6C45 or EC8020 type of driver tubes to get more gain. I will not go to the loadline determination practices again since it is extensively covered in the VT-62 / 801A tube amplifier pages. For those interested to look at loadline determination: Below is the B+ and filament PSU. There’s nothing to shout about here but is here to complete the picture.
The sound? Hmm.. IMHO, it’s dynamic with solid bass and yet it retains the tube & single-ended triode sound character. I guess matching is quite important here too as it is currently driving a 101dB/w/m 16 Ohm Zu Audio Soul Superfly. Brief tests with lower efficiency speakers like the B&W 601S2, Tannoy HPD385 and Tannoy System800 showed that it is quite capable as well (parafeed version). 2A3 amplifier powering Zu Audio Soul Superfly.DIY 2A3 amplifier with confidence and enjoy the music! For those with a bigger budget, here are the things you can consider upgrading: PSU – upgrade rectifier tube, increase B+ to 290V-300V, Blackgate WKZ capacitors, audiophile chokes / amorphous core chokes? Driver stage – install input step-up or 1:1 transformer, change driver tube to Telefunken EC8010, Western Electric WE437 or WE417A, amorphous core LL1660? Output stage – amorphous core output transformer, silver cable output transformer, amorphous plate choke? Overall – replace resistors with AB resistors (my current favorite) or better resistors, separate B+ and filament transformer, solid core silver cabling (handle with care)? One last tip – I hand matched most of the components before installing it on the amplifier. That helps with the channel imbalance and the voltage between left and right are very close at the finished amplifier. DIY 2A3 amplifier with confidence and enjoy the music! Ken Have you built any tube amplifiers?Do you have a great amplifier project? Share it! What Other Visitors Have SaidClick below to see contributions from other visitors to this page...
Parafeed 2A3 Not rated yet
Fabulous Not rated yet Return from DIY Audio Guide / DIY Tube Amplifier / DIY 2A3 Amplifier to DIY Audio Guide
|

